ubuntu server

casaos 설치

pcloudcc 설치
    pcloud마운트하기
    pcloudcc -u user@user.com -p -s -c -m /home/user/pcloud -d

casaos 앱스토어 Jellyfin 설치

version: '3.8'
services:
  jellyfin:
    image: jellyfin/jellyfin:latest
    container_name: jellyfin
    environment:
      - PUID=1000 # Replace with your user ID
      - PGID=1000 # Replace with your group ID
      - TZ=Europe/London # Replace with your timezone
    volumes:
      - /path/to/jellyfin/config:/config # Host path for Jellyfin configuration
      - /path/to/jellyfin/cache:/cache # Host path for Jellyfin cache
      - /home/user/pcloud:/media # Host path for your media files
    ports:
      - 8096:8096 # HTTP access
      - 8920:8920 # HTTPS access (optional)
      - 7359:7359/udp # For server discovery
    restart: unless-stopped
위의 - /home/user/pcloud:/media 를 마운트할때 permission denied 발생
GPT에게 물어보니 아래 답변
FUSE 마운트 권한 문제
pcloudcc는 FUSE(Filesystem in Userspace)로 동작합니다.
기본적으로 FUSE 마운트는 마운트한 사용자만 접근 가능하고, 다른 사용자/프로세스(특히 root, docker)가 접근하면 Permission denied가 나올 수 있어요.
/home/user/pcloud의 권한 변경을 해보았으나 permission denied 해결안됨
/home/user 폴더자체를 연결함. 그 후에 permission denied 없이 정상 구동
유저 home폴더를 연결 후 permission denied없이 연결됨

/home/user:/media

그 후 jellyfin에서 /home/user/pcloud 폴더의 영상폴더로 설정
#!/bin/bash

# ===========================================
# VLC 기반 CCTV 녹화 및 pcloud 백업 스크립트
# Raspberry Pi Model B Plus 최적화 (검증완료)
# CPU 사용률: 6-10%
# ===========================================

RTSP_URL="rtsp://아이디:암호@URL:554/stream2"
STORAGE_PATH="/home/pi/cctv"
PCLOUD_REMOTE="pcloud:Backups/cctv"
MAX_STORAGE_GB=20
SEGMENT_DURATION=600        # 10분 세그먼트
#BACKUP_INTERVAL=1800       # 30분마다 백업
BACKUP_INTERVAL=3600        # 60분마다 백업
KEEP_LOCAL_HOURS=12         # 로컬 파일 12시간 보관
MAX_LOCAL_FILES=200         # 최대 200개 파일
PCLOUD_KEEP_DAYS=7          # pcloud 7일 보관

LOG_FILE="/home/pi/script/cctv/log/cctv_backup.log"
LOCK_FILE="/h/cctv_upload.lock"

log() {
    echo "[$(date '+%Y-%m-%d %H:%M:%S')] $1" | tee -a "$LOG_FILE"
}

mkdir -p "$STORAGE_PATH"
mkdir -p "$STORAGE_PATH/uploading"
mkdir -p "$STORAGE_PATH/uploaded"
mkdir -p "$STORAGE_PATH/temp"

# 디스크 공간 체크 (적극적 정리)
check_disk_space() {
    local USED_MB=$(du -sm "$STORAGE_PATH" 2>/dev/null | awk '{print $1}')
    local USED_GB=$((USED_MB / 1024))

    if [ -z "$USED_GB" ]; then
        USED_GB=0
    fi

    # 15GB 넘으면 긴급 정리
    if [ "$USED_GB" -gt 15 ]; then
        log "⚠️  디스크 공간 위험 ($USED_GB GB / $MAX_STORAGE_GB GB)"
        log "   긴급 정리 시작..."

        local count=0
        while IFS= read -r file; do
            if [ -f "$file" ]; then
                rm -f "$file"
                log "   긴급 삭제: $(basename "$file")"
                count=$((count + 1))
                [ $count -ge 10 ] && break
            fi
        done < <(find "$STORAGE_PATH" -name "*.mp4" -type f -printf '%T+ %p\n' 2>/dev/null | sort | cut -d' ' -f2-)
    fi

    # 파일 개수로도 체크
    local FILE_COUNT=$(find "$STORAGE_PATH" -name "*.mp4" -type f 2>/dev/null | wc -l)
    if [ "$FILE_COUNT" -gt "$MAX_LOCAL_FILES" ]; then
        log "⚠️  파일 개수 초과 ($FILE_COUNT / $MAX_LOCAL_FILES)"
        local OVER_COUNT=$((FILE_COUNT - MAX_LOCAL_FILES + 10))

        local count=0
        while IFS= read -r file; do
            if [ -f "$file" ]; then
                rm -f "$file"
                log "   개수 초과 삭제: $(basename "$file")"
                count=$((count + 1))
                [ $count -ge $OVER_COUNT ] && break
            fi
        done < <(find "$STORAGE_PATH" -name "*.mp4" -type f -printf '%T+ %p\n' 2>/dev/null | sort | cut -d' ' -f2-)
    fi
}

# 네트워크 연결 확인
check_network() {
    local host=$(echo "$RTSP_URL" | sed -n 's|.*@\([^:]*\):.*|\1|p')
    if [ -z "$host" ]; then
        host=$(echo "$RTSP_URL" | sed -n 's|rtsp://\([^:/]*\).*|\1|p')
    fi

    if ping -c 1 -W 3 "$host" > /dev/null 2>&1; then
        return 0
    else
        return 1
    fi
}

# VLC 녹화 (안정화)
start_recording() {
    log "🎥 VLC 녹화 시작 (CPU 최적화 모드)"
    log "   RTSP: $RTSP_URL"
    log "   세그먼트: ${SEGMENT_DURATION}초"

    local consecutive_failures=0
    local MAX_FAILURES=5

    while true; do
        # 네트워크 체크
        if ! check_network; then
            log "❌ 네트워크 연결 없음, 60초 후 재시도..."
            consecutive_failures=$((consecutive_failures + 1))

            if [ $consecutive_failures -ge $MAX_FAILURES ]; then
                log "⚠️  연속 실패 ${consecutive_failures}회, 5분 대기..."
                sleep 300
                consecutive_failures=0
            else
                sleep 60
            fi
            continue
        fi

        local TIMESTAMP=$(date +%Y%m%d_%H%M%S)
        local TEMP_FILE="$STORAGE_PATH/temp/cctv_${TIMESTAMP}.mp4"
        local OUTPUT_FILE="$STORAGE_PATH/cctv_${TIMESTAMP}.mp4"

        log "📹 녹화 시작: $(basename "$OUTPUT_FILE")"

        # VLC 실행 (에러 출력을 파일로 저장)
        local VLC_LOG="/tmp/vlc_${TIMESTAMP}.log"

        timeout $((SEGMENT_DURATION + 30)) cvlc \
            "rtsp://아이디:암호@URL:554/stream2" \
            --quiet \
            --no-audio \
            --no-sout-audio \
            --rtsp-tcp \
            --network-caching=2000 \
            --sout-mux-caching=2000 \
            --sout "#std{access=file,mux=mp4,dst=$TEMP_FILE}" \
            --run-time="$SEGMENT_DURATION" \
            vlc://quit \
            > "$VLC_LOG" 2>&1

        local VLC_EXIT=$?

        # 에러 로그에서 심각한 문제만 기록
        if [ -f "$VLC_LOG" ]; then
            grep -E "error:|failed|cannot" "$VLC_LOG" | grep -v "PulseAudio\|interface\|globalhotkeys\|dummy" >> "$LOG_FILE"
            rm -f "$VLC_LOG"
        fi

        # 녹화 결과 확인
        if [ -f "$TEMP_FILE" ] && [ -s "$TEMP_FILE" ]; then
            local FILE_SIZE=$(du -h "$TEMP_FILE" | cut -f1)

            # 최소 크기 확인 (1MB 이상)
            local FILE_SIZE_BYTES=$(stat -c%s "$TEMP_FILE" 2>/dev/null || echo 0)
            if [ "$FILE_SIZE_BYTES" -lt 1048576 ]; then
                log "⚠️  파일 크기 너무 작음: $FILE_SIZE_BYTES bytes"
                rm -f "$TEMP_FILE"
                consecutive_failures=$((consecutive_failures + 1))
                sleep 10
                continue
            fi

            # 정상 파일 이동
            mv "$TEMP_FILE" "$STORAGE_PATH/uploading/"
            log "✅ 녹화 완료: $(basename "$OUTPUT_FILE") ($FILE_SIZE)"

            consecutive_failures=0

            # 시스템 상태 (5회마다 출력)
            if [ $((RANDOM % 5)) -eq 0 ]; then
                if command -v vcgencmd &> /dev/null; then
                    local CPU_TEMP=$(vcgencmd measure_temp 2>/dev/null | grep -oP '\d+\.\d+' || echo "N/A")
                    log "   CPU 온도: ${CPU_TEMP}°C"
                fi

                local MEM_FREE=$(free -m | awk 'NR==2{printf "%.0f", $7}')
                log "   여유 메모리: ${MEM_FREE}MB"
            fi

        else
            log "❌ 녹화 실패: $(basename "$OUTPUT_FILE") (exit: $VLC_EXIT)"
            rm -f "$TEMP_FILE"

            consecutive_failures=$((consecutive_failures + 1))

            # 연속 실패 시 긴 대기
            if [ $consecutive_failures -ge $MAX_FAILURES ]; then
                log "⚠️  연속 실패 ${consecutive_failures}회, RTSP 연결 문제 가능성"
                log "   5분 후 재시도..."
                sleep 300
                consecutive_failures=0
            else
                sleep 30
            fi
        fi

        check_disk_space
        sleep 5
    done
}

# pcloud 업로드 (중복 실행 방지 + 개선)
upload_to_pcloud() {
    log "☁️  pcloud 백업 프로세스 시작"

    while true; do
        sleep "$BACKUP_INTERVAL"

        # 업로드 중인지 확인 (lock 파일)
        if [ -f "$LOCK_FILE" ]; then
            local LOCK_PID=$(cat "$LOCK_FILE" 2>/dev/null)
            if ps -p "$LOCK_PID" > /dev/null 2>&1; then
                log "⏳ 이전 업로드 진행 중 (PID: $LOCK_PID), 대기..."
                continue
            else
                log "⚠️  오래된 lock 파일 제거"
                rm -f "$LOCK_FILE"
            fi
        fi

        # rclone 연결 확인
        if ! rclone about "$PCLOUD_REMOTE" > /dev/null 2>&1; then
            log "❌ pcloud 연결 실패, 다음 사이클에 재시도"
            continue
        fi

        # lock 생성
        echo $$ > "$LOCK_FILE"

        # 2분 이상 된 파일만 업로드
        local UPLOAD_COUNT=0
        local SKIP_COUNT=0
        local FAIL_COUNT=0

        while IFS= read -r file; do
            if [ ! -f "$file" ]; then
                continue
            fi

            local FILENAME=$(basename "$file")
            local DATE_STR=$(echo "$FILENAME" | grep -oE '[0-9]{8}' | head -1)

            local REMOTE_PATH="$PCLOUD_REMOTE"
            if [ -n "$DATE_STR" ]; then
                local YEAR=${DATE_STR:0:4}
                local MONTH=${DATE_STR:4:2}
                REMOTE_PATH="$PCLOUD_REMOTE/$YEAR/$MONTH"
            fi

            # pcloud에 이미 존재하는지 확인
            if rclone ls "$REMOTE_PATH/$FILENAME" > /dev/null 2>&1; then
                log "⏭️  건너뜀: $FILENAME (이미 존재)"
                mv "$file" "$STORAGE_PATH/uploaded/"
                SKIP_COUNT=$((SKIP_COUNT + 1))
                continue
            fi

            local FILE_SIZE=$(du -h "$file" | cut -f1)
            log "⬆️  업로드: $FILENAME ($FILE_SIZE)"

            if rclone copy "$file" "$REMOTE_PATH" \
                --transfers 1 \
                --checkers 1 \
                --buffer-size 8M \
                --bwlimit 2M \
                --retries 3 \
                --low-level-retries 3 \
                --timeout 300s \
                --contimeout 60s \
                --stats 0 \
                -q >> "$LOG_FILE" 2>&1; then

                # 업로드 검증
                if rclone ls "$REMOTE_PATH/$FILENAME" > /dev/null 2>&1; then
                    log "✅ 업로드 성공: $FILENAME"
                    mv "$file" "$STORAGE_PATH/uploaded/"
                    UPLOAD_COUNT=$((UPLOAD_COUNT + 1))
                else
                    log "❌ 업로드 검증 실패: $FILENAME"
                    FAIL_COUNT=$((FAIL_COUNT + 1))
                fi
            else
                log "❌ 업로드 실패: $FILENAME (재시도 예정)"
                FAIL_COUNT=$((FAIL_COUNT + 1))
            fi

        done < <(find "$STORAGE_PATH/uploading" -name "*.mp4" -type f -mmin +2 2>/dev/null)

        if [ $UPLOAD_COUNT -gt 0 ] || [ $SKIP_COUNT -gt 0 ] || [ $FAIL_COUNT -gt 0 ]; then
            log "📊 업로드 결과 - 성공: ${UPLOAD_COUNT}, 건너뜀: ${SKIP_COUNT}, 실패: ${FAIL_COUNT}"
        else
            log "📭 업로드할 파일 없음"
        fi

        # lock 해제
        rm -f "$LOCK_FILE"
    done
}

# 파일 정리 (로컬 + pcloud)
cleanup_old_files() {
    log "🗑️  파일 정리 프로세스 시작"

    while true; do
        sleep 1800  # 30분마다

        # 로컬 정리 - 12시간 이상
        local DELETED=$(find "$STORAGE_PATH/uploaded" -name "*.mp4" -type f -mmin +$((KEEP_LOCAL_HOURS * 60)) -delete -print 2>/dev/null | wc -l)

        if [ "$DELETED" -gt 0 ]; then
            log "🗑️  로컬 정리: ${DELETED}개 파일 삭제 (${KEEP_LOCAL_HOURS}시간 이상)"
        fi

        # uploading 폴더 - 1일 이상
        local OLD_UPLOADING=$(find "$STORAGE_PATH/uploading" -name "*.mp4" -type f -mmin +1440 -delete -print 2>/dev/null | wc -l)

        if [ "$OLD_UPLOADING" -gt 0 ]; then
            log "🗑️  오래된 업로딩 파일 삭제: ${OLD_UPLOADING}개"
        fi

        # temp 폴더 정리
        find "$STORAGE_PATH/temp" -name "*.mp4" -type f -mmin +60 -delete 2>/dev/null

        # 통계
        local USED_MB=$(du -sm "$STORAGE_PATH" 2>/dev/null | awk '{print $1}')
        local USED_GB=$((USED_MB / 1024))
        local FILE_COUNT=$(find "$STORAGE_PATH" -name "*.mp4" -type f 2>/dev/null | wc -l)
        log "💾 저장 공간: ${USED_GB}GB / ${MAX_STORAGE_GB}GB, 파일: ${FILE_COUNT}개"

        # 6시간마다 pcloud 정리
        local CLEANUP_MARKER="/tmp/pcloud_cleanup_last"
        local CURRENT_TIME=$(date +%s)
        local LAST_CLEANUP=0

        if [ -f "$CLEANUP_MARKER" ]; then
            LAST_CLEANUP=$(stat -c %Y "$CLEANUP_MARKER" 2>/dev/null || echo 0)
        fi

        if [ $((CURRENT_TIME - LAST_CLEANUP)) -gt 21600 ]; then
            cleanup_pcloud
            touch "$CLEANUP_MARKER"
        fi
    done
}

# pcloud 정리
cleanup_pcloud() {
    log "☁️  pcloud 정리 시작 (${PCLOUD_KEEP_DAYS}일 이상)"

    if ! rclone listremotes 2>/dev/null | grep -q "pcloud:"; then
        log "   rclone 미설정, 건너뜀"
        return
    fi

    # 연결 확인
    if ! rclone about "$PCLOUD_REMOTE" > /dev/null 2>&1; then
        log "❌ pcloud 연결 실패"
        return
    fi

    log "   ${PCLOUD_KEEP_DAYS}일 이전 파일 삭제 중..."

    # 삭제 실행
    if rclone delete "$PCLOUD_REMOTE" \
        --min-age "${PCLOUD_KEEP_DAYS}d" \
        --verbose \
        >> "$LOG_FILE" 2>&1; then

        log "✅ pcloud 정리 완료"

        # 용량 확인
        local PCLOUD_SIZE=$(rclone size "$PCLOUD_REMOTE" 2>/dev/null | grep "Total size:" | awk '{print $3, $4}')
        if [ -n "$PCLOUD_SIZE" ]; then
            log "☁️  pcloud 사용량: $PCLOUD_SIZE"
        fi
    else
        log "⚠️  pcloud 정리 중 오류 발생"
    fi
}

# 시스템 모니터링
monitor_system() {
    while true; do
        sleep 300  # 5분마다

        # VLC 프로세스 체크
        if ! pgrep -f "cvlc" > /dev/null 2>&1; then
            log "⚠️  VLC 프로세스 미실행"
        fi

        # 시스템 리소스
        local CPU_TEMP="N/A"
        if command -v vcgencmd &> /dev/null; then
            CPU_TEMP=$(vcgencmd measure_temp 2>/dev/null | grep -oP '\d+\.\d+' || echo "N/A")
        fi

        local MEM_USAGE=$(free -m | awk 'NR==2{printf "%.1f%%", $3*100/$2}')
        local DISK_USAGE=$(df -h "$STORAGE_PATH" | awk 'NR==2{print $5}')
        local CPU_LOAD=$(uptime | awk -F'load average:' '{print $2}' | awk '{print $1}' | tr -d ',')

        log "📊 시스템 - CPU: ${CPU_TEMP}°C, 부하: ${CPU_LOAD}, 메모리: ${MEM_USAGE}, 디스크: ${DISK_USAGE}"
    done
}

# 종료 핸들러
cleanup_and_exit() {
    log "🛑 종료 신호 수신"
    rm -f "$LOCK_FILE"
    pkill -P $$
    pkill vlc 2>/dev/null
    log "✅ 스크립트 종료"
    exit 0
}

trap cleanup_and_exit SIGINT SIGTERM

# 메인 실행
log "=========================================="
log "🎬 VLC 기반 CCTV 녹화 시스템 시작 (v2.0)"
log "=========================================="
log "📍 RTSP URL: $RTSP_URL"
log "💾 저장 경로: $STORAGE_PATH"
log "☁️  pcloud 경로: $PCLOUD_REMOTE"
log "📦 최대 저장 용량: ${MAX_STORAGE_GB}GB"
log "⏱️  세그먼트 길이: ${SEGMENT_DURATION}초"
log "🔄 백업 주기: ${BACKUP_INTERVAL}초"
log "🗓️  로컬 보관: ${KEEP_LOCAL_HOURS}시간"
log "☁️  pcloud 보관: ${PCLOUD_KEEP_DAYS}일"
log "📁 최대 파일: ${MAX_LOCAL_FILES}개"
log "=========================================="

# VLC 확인
if ! command -v cvlc &> /dev/null; then
    log "❌ VLC 미설치: sudo apt install vlc"
    exit 1
fi

# rclone 확인
UPLOAD_DISABLED=0
if ! rclone listremotes 2>/dev/null | grep -q "pcloud:"; then
    log "⚠️  rclone pcloud 미설정 (업로드 비활성화)"
    UPLOAD_DISABLED=1
fi

# 초기 네트워크 확인
if ! check_network; then
    log "⚠️  RTSP 호스트에 연결할 수 없습니다"
    log "   계속 시도하지만 녹화가 실패할 수 있습니다"
fi

# 백그라운드 프로세스 시작
start_recording &
RECORDING_PID=$!

if [ $UPLOAD_DISABLED -eq 0 ]; then
    upload_to_pcloud &
    UPLOAD_PID=$!
fi

cleanup_old_files &
CLEANUP_PID=$!

monitor_system &
MONITOR_PID=$!

log "✅ 모든 프로세스 시작 완료"
log "   녹화 PID: $RECORDING_PID"
[ $UPLOAD_DISABLED -eq 0 ] && log "   업로드 PID: $UPLOAD_PID"
log "   정리 PID: $CLEANUP_PID"
log "   모니터링 PID: $MONITOR_PID"
log "=========================================="

# 메인 프로세스 대기
wait
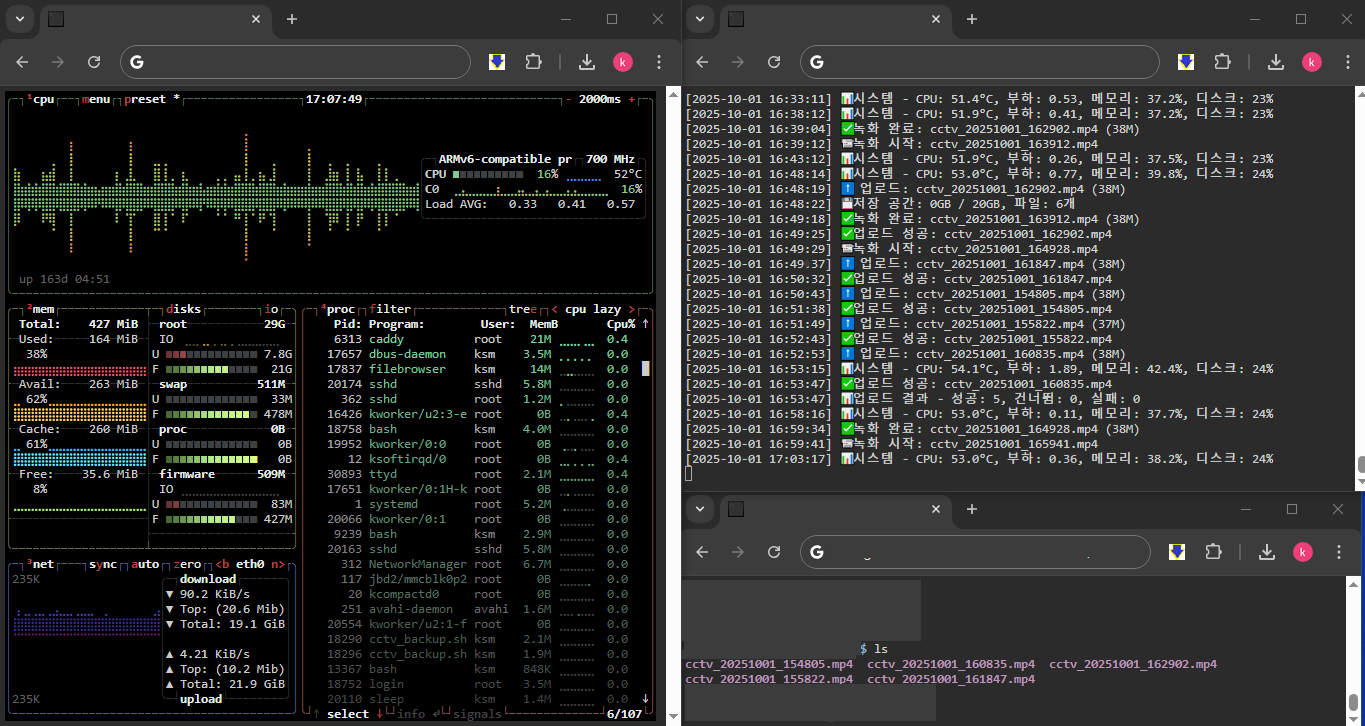
ROG, CPU, RAM, NETWORK 사용률 (BTOP++, LOG)
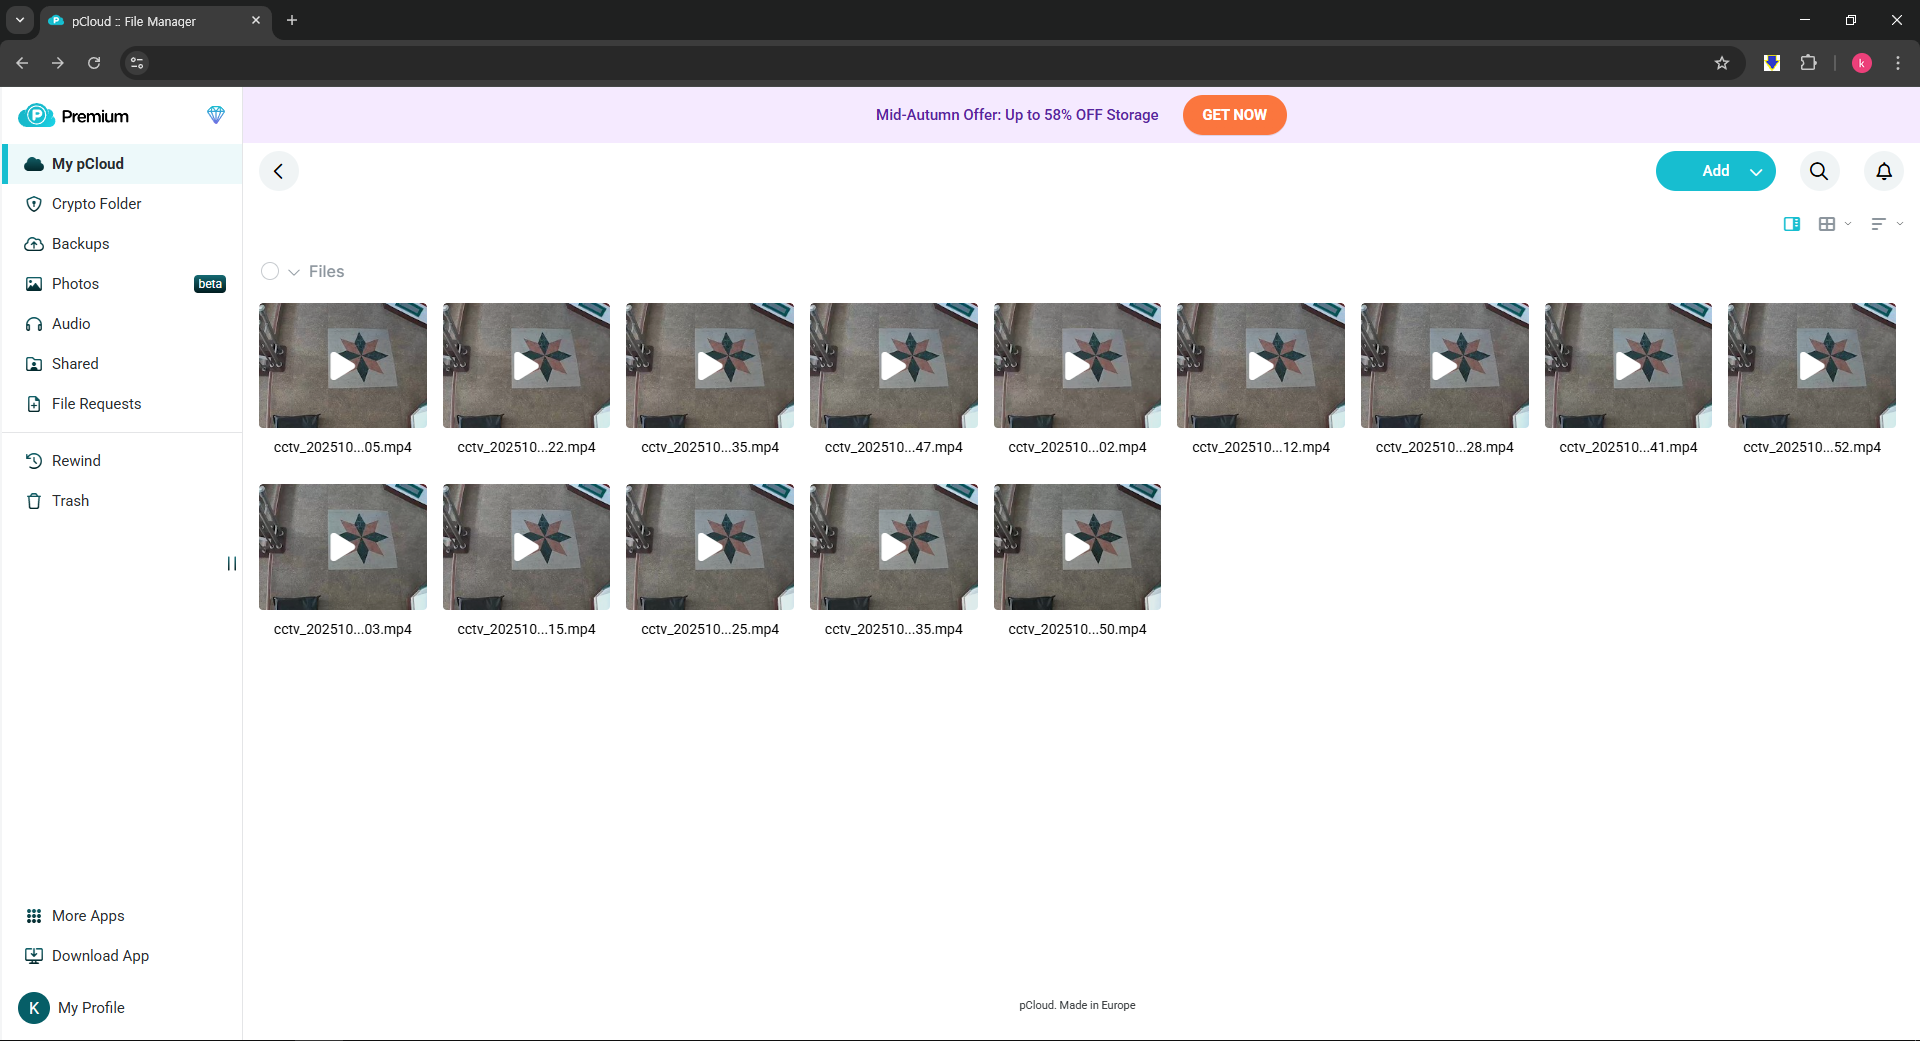
PCLOUD에 정상적으로 업로드도 확인 되었다.
기타 테스트
# 1. 실행
./cctv_backup.sh

# 2. 로그 확인 (다른 터미널)
tail -f /var/log/cctv_backup.log

# 3. 확인할 것
# ✓ 녹화 시작 메시지
# ✓ 10분 후 파일 생성 확인
# ✓ 30분 후 업로드 시작 확인
# ✓ pcloud에 파일 업로드 확인

# 4. 파일 확인
ls -lh /home/pi/cctv/uploading/
ls -lh /home/pi/cctv/uploaded/

# 5. pcloud 확인
rclone ls pcloud:Backups/cctv